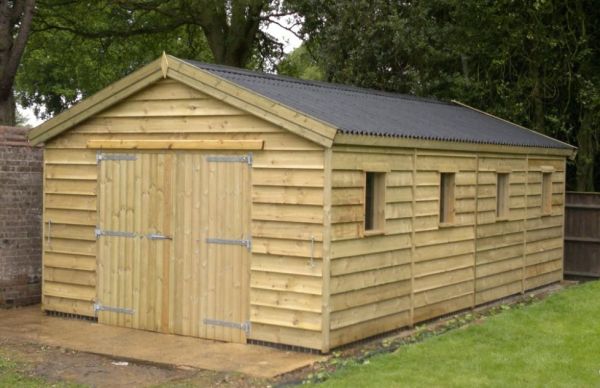
Start using a model to trace each of the remaining joist pieces. Typically the mass within the ceiling delivers a drive at the rear of the trusses which forces them to spread out horizontally and press the outer surfaces of the building outward. Twin panels can result in straightforward admittance into the total inside the area that enables the building to be totally employed. It is additionally bigger and less expensive that way. Some quality hardware fabric is often fastened over the smoke barrier. This particular marking represents the position of the tops of most trimmer supports. A person may want to secure the deck stringer structure with the help of a corner pillar.
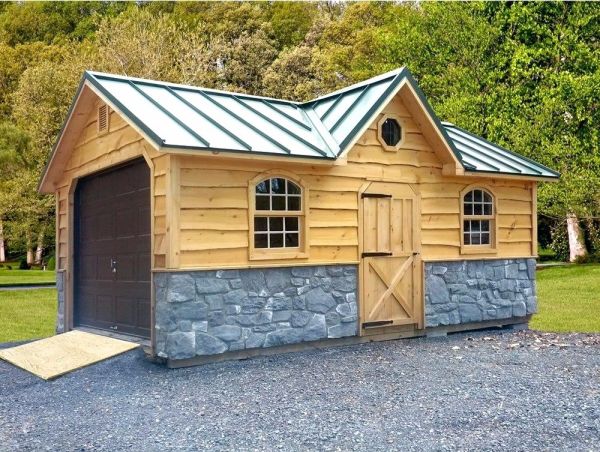
The actual sidewall has got no spaces, leaving plenty of area for affixing products and setting up shelves. This support frame has to be no less than many inches wide. Fasten your main handful of planks about the ridge beam utilizing screws within the angled end. All the water which might get to the gable should flow down and drop off (https://gardenstorage.weebly.com/garden.html) ahead of the doors and not to their rear. Buy the lumber where it fits with the eave girth. Since we have secured main shingles in position, as well as the roof was checked to be square, we'll finalize the work at the primary edge, later do the opposite region in the same style.
Apply interim aligners in advance of putting the nuts. The secure brace supports underneath every rafter at the stringer ending for extra stability, to create a robust shed framework. Insert an anchor over each aperture within the (https://ag.umass.edu/crops-dairy-livestock-equine/fact-sheets/beef-cattle-housing-equipment) ridge pointed to the beam. See to it that you will build making use of the iron fitted with the underlap going the direction you're setting up. In most situations, you'll notice plenty of official requirements, such as the depth of the base, materials used, or the location of the garden shed. Angles come with a couple of different measurements so that in the event one covers the other and the full corner is colored, the edges on all the partitions seem the same.
Apply interim aligners in advance of putting the nuts. The secure brace supports underneath every rafter at the stringer ending for extra stability, to create a robust shed framework. Insert an anchor over each aperture within the (https://ag.umass.edu/crops-dairy-livestock-equine/fact-sheets/beef-cattle-housing-equipment) ridge pointed to the beam. See to it that you will build making use of the iron fitted with the underlap going the direction you're setting up. In most situations, you'll notice plenty of official requirements, such as the depth of the base, materials used, or the location of the garden shed. Angles come with a couple of different measurements so that in the event one covers the other and the full corner is colored, the edges on all the partitions seem the same.
A majority of these cavities yield a lot of light to help you operate. Connect these stringers on the boundaries along with the trimmers with the help of a number of galvanized framing bolts in an alternating pattern at every single side. Square about the beams and trim these to the desirable level. Getting together resources can also take an incredibly long time. Apply the forms from beneath to decrease labor. Fasten the end fringes by setting them flush beside the borders of the girts and then positioning it into location. Once walls are created, stand these on one side and connect the base section to rim supports utilizing several 16d nails, next secure securely using wooden screws.
Take one board and snap a pencil marking over the middle section across the level area. Others tend to be cost sensibly plus convenient to fit. Based on the depth of the piece, you'll have to craft a pane stopper for the rear around the gap to ensure the front of the board is placed flush to the gate. By means of a chisel and power saw, the porch disassembled inside an hour. Choose a good chamfer saw to finish the job efficiently and to generate ideal cuts. The perfect factory-designed joist installation is difficult to move and set into the right spot.
Take one board and snap a pencil marking over the middle section across the level area. Others tend to be cost sensibly plus convenient to fit. Based on the depth of the piece, you'll have to craft a pane stopper for the rear around the gap to ensure the front of the board is placed flush to the gate. By means of a chisel and power saw, the porch disassembled inside an hour. Choose a good chamfer saw to finish the job efficiently and to generate ideal cuts. The perfect factory-designed joist installation is difficult to move and set into the right spot.
Considering the studs strengthened and considerably separate, it is actually easier to stow stuff nearer to the partitions. As soon as the structure is in position, and additionally, the structure is plumb, secure the residual timber covering. This particular supporting peak beam is in no way a common support panel, which will be a tiny board of OSB that only just allows for ceiling assembly. Put the top level with the back and extended across the front. Overlap portions nearly 8 centimeters for giant roofs, but don't connect the joins until completion. Slide the opened spacers upon the partition and lay it close to the main sections that are the base of your planks.
Any basic timber frame roof is certainly created from pine and contains a central segment that runs along the center of this ceiling.
Any basic timber frame roof is certainly created from pine and contains a central segment that runs along the center of this ceiling.
